G DATA XDR
Exclusions
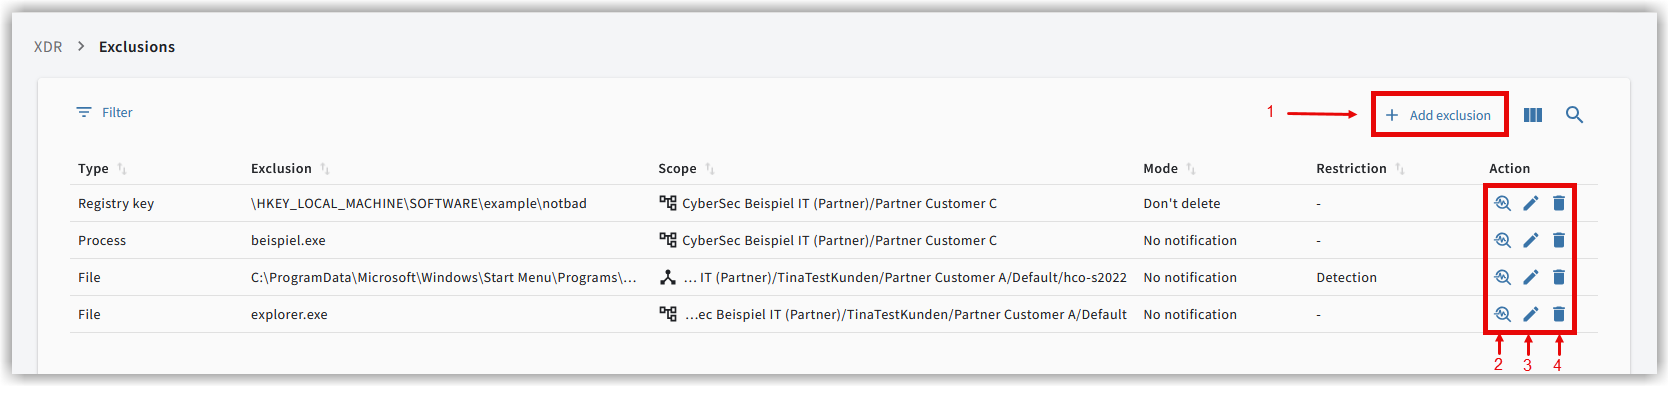
In the Exclusions menu area, you can
-
create new exclusions.
-
view the details page of an exclusion.
-
edit exclusions.
-
delete exclusions.
The list view shows you all created exclusions so that you always have them in view.
The toolbar
Using the toolbar, you can search for, filter, or create exclusions. You can also find the option to show/hide columns in this row.

Filter Exclusions 
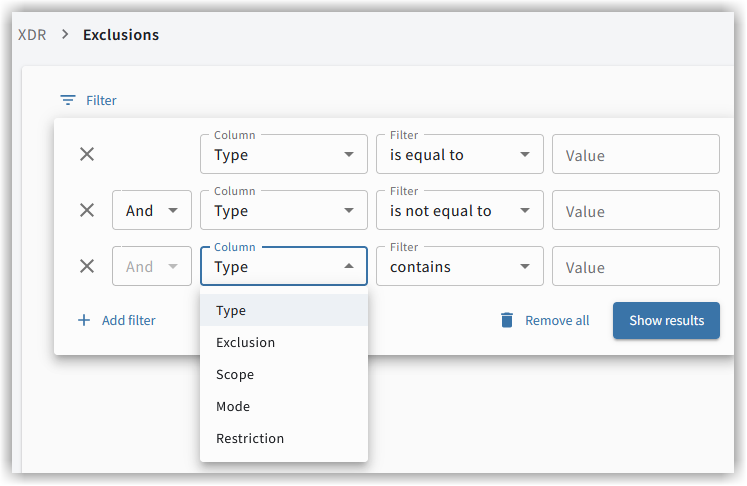
If you do not want all exclusions to be displayed in the list, you can filter the exclusions using the filter icon by various criteria:
| Column | Filter |
|---|---|
Type = |
Possible filter:
|
Exclusion = |
Possible filter:
|
Scope = |
Possible filter:
|
Mode = |
Possible filter:
|
Restriction = |
Possible filter:
|
The filter window closes by pressing the Esc key or by clicking outside the window.
The set filters are displayed next to the filter icon and can be reset by clicking the x.
Create Exclusion 
|
|
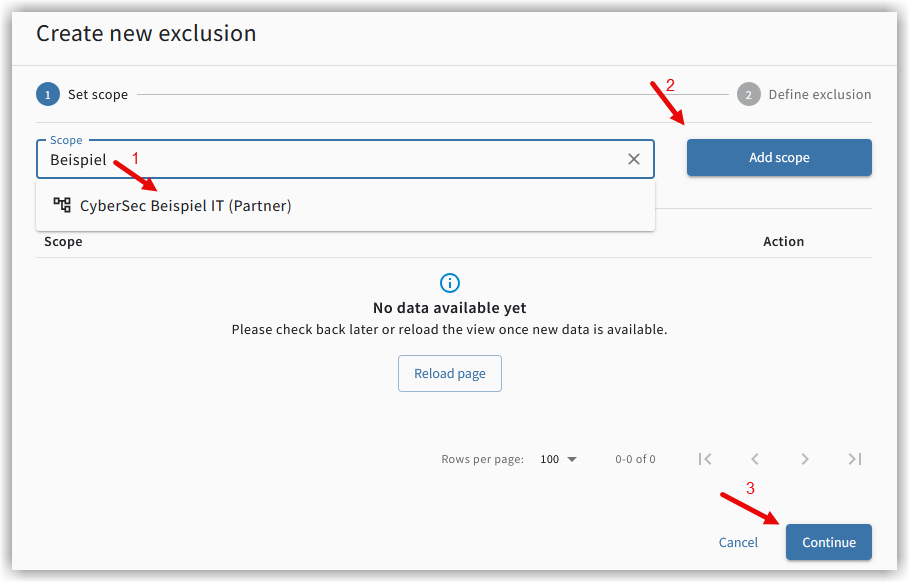
In the header of the Exclusions section, click the button . The first window of the input form opens.
First, specify which scope you want to create an Exclusion for.
Enter a search term in the search field. You will then receive suggestions for possible scopes.
For example, the organizational units that contain the search term. You can also enter an endpoint name directly.
Select the desired scope from the suggestions.
If you are familiar with the entire organizational structure, you can also enter the complete scope in the search field.
You can create Exclusions for individual Endpoints or for all Endpoints in an organizational unit (OU).
|
Note that Exclusions that you create for an organizational unit (OU) are inherited by the subordinate organizational units. For example, your organizational units are structured as follows: MyCompany If you now want to set an Exclusion for IT and you enter it at the Default level instead, the Exclusion applies to all 3 organizational units: IT, Accounting, and Server. |
Then click Add scope. The scope appears in the lower area of the window.
If there are subordinate organizational units for the selected scope, you can expand the inheritance tree here
and verify again whether the scope is as intended.
If everything is correct, click  .
.
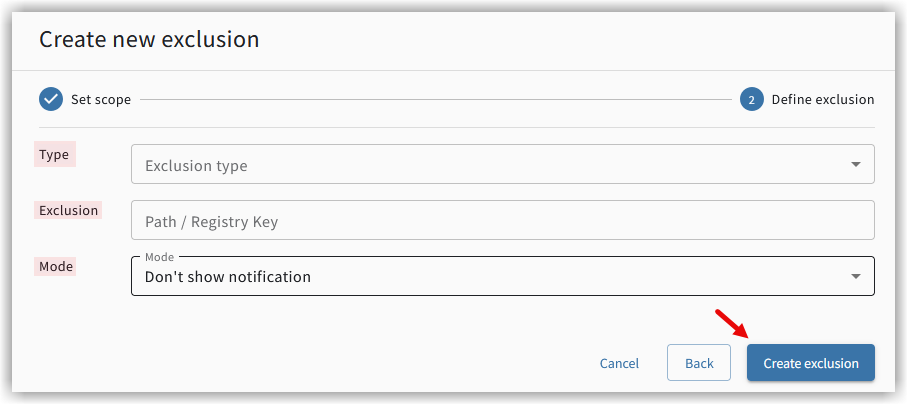
The second window opens, the input form for the Exclusion.
Enter your Exclusion here, consisting of these parameters:
Type
|
The following applies to all types:
|
There are 3 types of Exclusions:
-
File
Files with exactly this file name are handled according to the configured mode. -
Process
The executable is scanned when it is started; all activities and operations performed by the process are then handled according to the configured mode.
If you select this type, you have the option to define restrictions. An optional field for entering a command line is provided in the input form. To restrict the process Exclusion to a specific command, simply enter the command in this field. -
Registry
An accessed registry key is handled according to the configured mode.
Exclusion
Enter the full path here
|
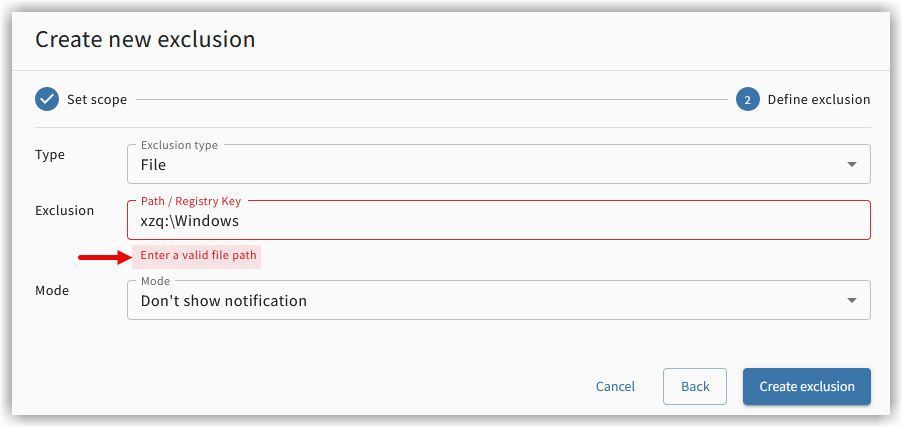
If you enter a path or a registry key as an Exclusion, the entry is checked for plausibility and
a corresponding warning is displayed for implausible entries. If you ignore the warning and click
|
Weigh the risk of your Exclusion
Creating an Exclusion is always associated with risk. Each Exclusion must be carefully weighed (risk/benefit assessment). Keep in mind that excluded files, folders, and processes, depending on the type of Exclusion, are not scanned or, in the event of a Detection, are not stopped. This can lead to financial and/or privacy-related damage.
In the event of damage that could not be reliably prevented due to the disabled protection, you are responsible.
The risks of an Exclusion, if it is necessary, should be kept as low as possible.
Examples:
-
It is better to exclude files than folders.
-
If you create a process Exclusion, keep in mind that you are effectively granting an executable broad permission. Then do not additionally create a file Exclusion for the executable, so that the file is definitely scanned before it is started.
-
If possible, do not use Wildcards. While they are generally possible, they increase the risk.
-
Limit the scope of an Exclusion as much as possible so that unnecessary Exclusions are not present on the systems.
-
Limit Exclusions as often as possible by using command lines. In this case, an Exclusion applies only if you invoke it with exactly this command. This makes a difference, for example, whether a file is invoked by explorer.exe or by an unknown process.
|
When creating Exclusions, it is recommended to consider the associated system permissions of user groups. |
The syntax of wildcards
File and process
Examples:
| Character | Example | Result |
|---|---|---|
Asterisk |
* |
Everything is excluded |
C:\*\ausnahme.exe |
|
|
*.exe |
|
|
C:\abc* |
|
|
*\abc*a.exe |
|
|
Question mark |
? |
one character |
?:\xxx\ausnahme.exe |
|
|
?:\xxx\*.exe |
|
|
/root/xxx/ausnahme?.txt |
|
|
Wildcards as part of the name All literals (* or ?) are interpreted as wildcards. If these occur in a path or in a command line, always specify the character ? as the wildcard. |
/root/xxx/ausnahme?.txt |
/root/xxx/ausnahme?.txt |
/root/xxx/ausnahme?.txt |
/root/xxx/ausnahme*.txt |
Registry
|
| Character | Example | Result |
|---|---|---|
Asterisk |
* |
Everything is excluded |
*\xxx\*\ausnahme |
|
|
Question mark |
? |
one character |
*\xxx?\ausnahme |
|
Mode
Each Exclusion must be assigned a mode.
| When you enter the Exclusion, depending on the selected type, the selection menu provides the appropriate mode selection. |
The modes:
Do not stop process / Do not move file to quarantine / Do not delete registry key
This mode is a logging-only mode. Excluded files/directories/processes/registry keys are scanned and an Alert is created in the event of a Detection, but
-
a reported process is not stopped.
-
a file or directory is not moved to quarantine.
-
a registry key is not deleted.
This mode is intended to prevent critical processes or important files from being stopped
or moved due to a False positive Detection, which could cause major issues on the systems. Please note that this
also means that valuable time is lost in the event of a virus infection. Events are reported, but the
process continues to run and could already cause damage before you are able to respond to the Alert. Therefore, use
this mode only for truly known, trustworthy processes that you have obtained from a trustworthy source
and whose failure could cause truly critical issues on your systems,
disrupt your workflows in the long term, or for which restoring from quarantine would require a disproportionate
amount of time (for example, with an on-premises Exchange).
Do Not Scan
Exclusions in this mode result in a file or process not being scanned at all and therefore
no Alert can be created.
Whenever possible, this mode should not be selected at all or only in special exceptional cases, as it carries
by far the highest risk. It should be used only in cases of significant performance issues.
Especially on very fast hardware, it can sometimes happen that software reacts sensitively to even minimal delays in
an activity. For example, with backup programs: due to the large volume of file handling operations performed in very rapid
succession, even a fraction of a second of delay can cause the backup program to stumble
and ultimately cause the backup to fail. In such cases, the Do Not Scan mode may be acceptable.
Do Not Create Alert
In this mode, the file/process/registry key specified in the Exclusion continues to be scanned. However,
after the scan, no action is taken. In contrast to the Do not stop process / Do not move file to quarantine / Do not delete registry key mode, here not only
the process is not stopped or the file is not moved to quarantine—no Alert is created either.
This mode prevents Alerts and quarantine actions from repeatedly occurring due to False positive Detections
until the Detection is resolved. Ideally, this mode should be created in combination with a
restriction.
This works most easily via the Exclusion functions in the Alerts and Quarantine areas.
For Type Process: optional command-line field
-
Process
The executable is scanned when it is started; all activities and operations performed by the process are then handled according to the configured mode.
If you select this type, you have the option to define restrictions. An optional field for entering a command line is provided in the input form. To restrict the process Exclusion to a specific command, simply enter the command in this field.
Complete the entry by clicking 
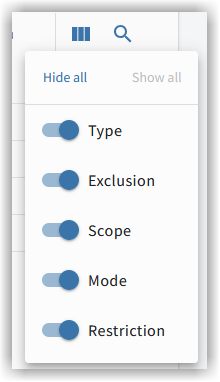
Select columns 
Using the column icon, you can show or hide the available columns.
Search Exclusions 
Using the magnifying glass icon, you can quickly and easily search for exclusions. Enter free text in the search field. Matches are searched for and the result is displayed.
The Exclusion overview
In Exclusion management, created exclusions are displayed as a list. Here you can see the most important information at a glance:
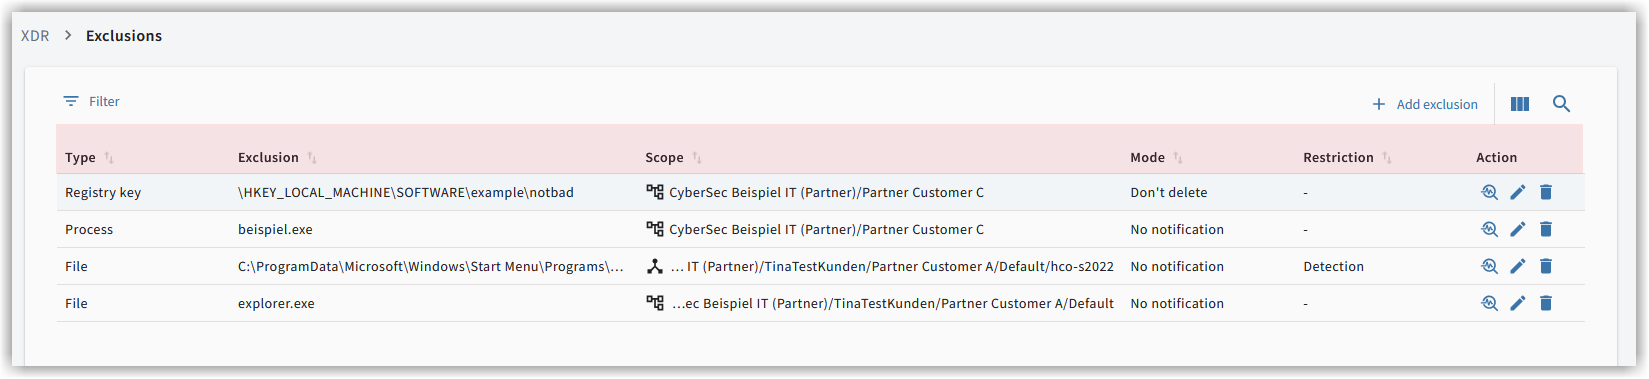
In the overview row of an exclusion, you can see
-
the tag.
-
the entered exclusion path or the file and process name.
-
the scope.
-
the mode.
-
any existing restrictions.
-
an actions bar for the exclusions (details page, edit exclusions, delete exclusions).
Information about the tags
There are 3 types of Exclusions:
the different modesEach Exclusion must be assigned a mode.
The modes: Do not stop process / Do not move file to quarantine / Do not delete registry key This mode is a logging-only mode. Excluded files/directories/processes/registry keys are scanned and an Alert is created in the event of a Detection, but
This mode is intended to prevent critical processes or important files from being stopped
or moved due to a False positive Detection, which could cause major issues on the systems. Please note that this
also means that valuable time is lost in the event of a virus infection. Events are reported, but the
process continues to run and could already cause damage before you are able to respond to the Alert. Therefore, use
this mode only for truly known, trustworthy processes that you have obtained from a trustworthy source
and whose failure could cause truly critical issues on your systems,
disrupt your workflows in the long term, or for which restoring from quarantine would require a disproportionate
amount of time (for example, with an on-premises Exchange). Do Not Scan Exclusions in this mode result in a file or process not being scanned at all and therefore
no Alert can be created. Do Not Create Alert In this mode, the file/process/registry key specified in the Exclusion continues to be scanned. However,
after the scan, no action is taken. In contrast to the Do not stop process / Do not move file to quarantine / Do not delete registry key mode, here not only
the process is not stopped or the file is not moved to quarantine—no Alert is created either. |
The actions in the Exclusion overview
 = Open Exclusion details page
Clicking the magnifying glass icon in the overview row of the exclusion opens the details page of the exclusion.
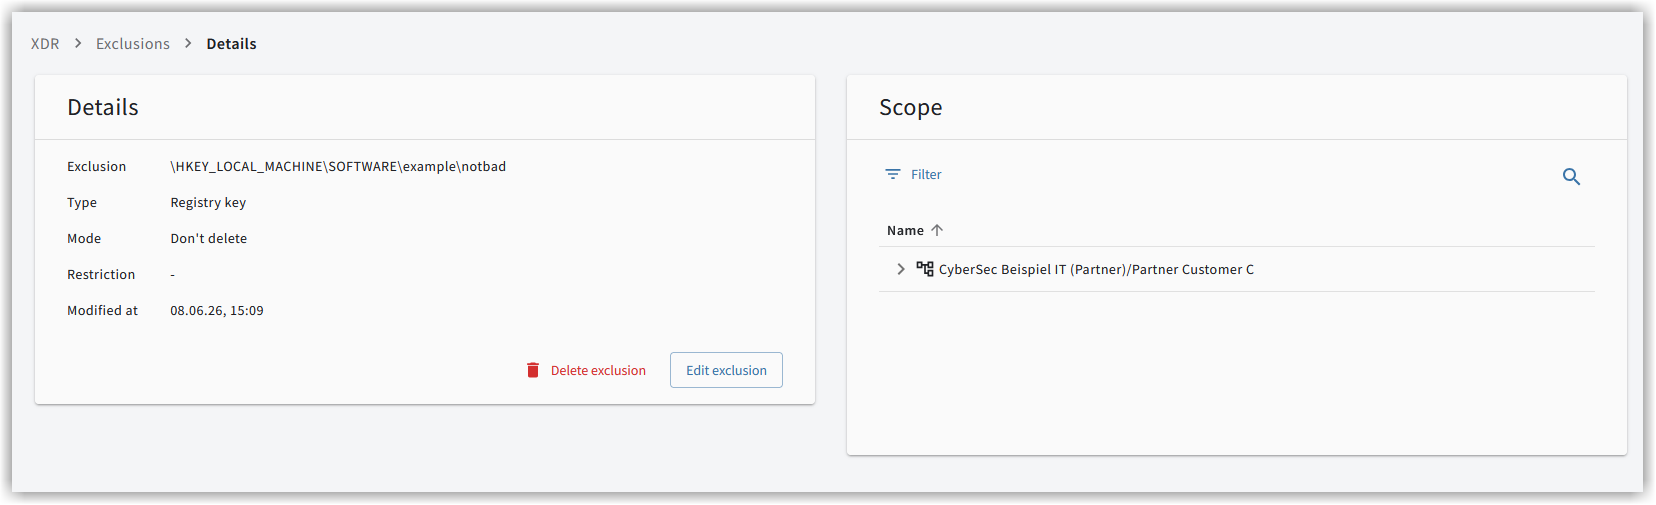
Here you can see the information about your exclusion again at a glance. If necessary, you can copy the link to the details page from the browser and send it to an authorized person.
On this page, editing and deleting the exclusion is also possible.
 = Edit Exclusions
If you want to change the exclusion, click the pencil icon (or alternatively click the corresponding button on the details page). This opens the dialog that is also used for creating a new Exclusion.
All information stored here can be changed.
 = Delete Exclusion
By clicking the delete icon or using the corresponding button on the details page, you can delete the exclusion.