Der G DATA USB Keyboard Guard
The G DATA USB Keyboard Guard protects systems from so-called "Bad USB" attacks, which refer to attacks carried out via USB devices that masquerade as keyboards to automatically execute unwanted keystrokes. If the system detects a new keyboard, access is initially blocked and a pop-up is displayed. You can then verify whether the device is actually a keyboard and either allow or block access.
Using the G DATA USB Keyboard Guard
When a new keyboard, or a device that acts as a keyboard, is connected, a Windows notification appears when you are using G DATA USB Keyboard Guard. This notification asks you whether you trust the new device.
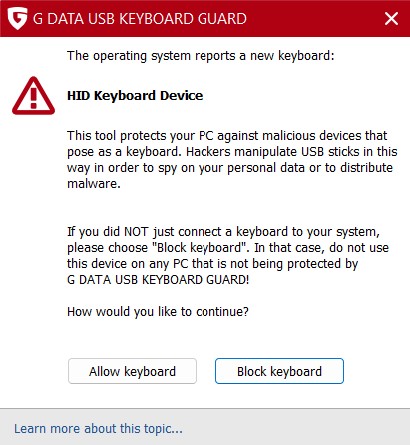
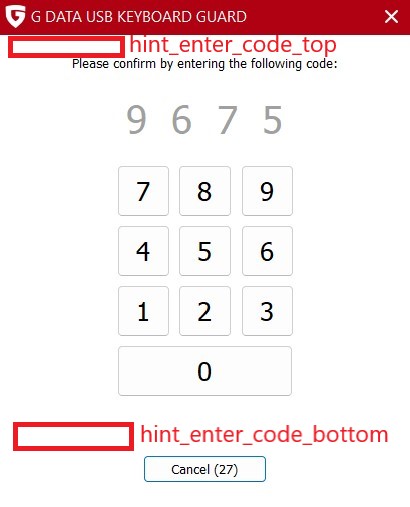
Here, you have the option to block the device or allow the keyboard. If you allow the device, you must then enter a four-digit code as an additional security measure.
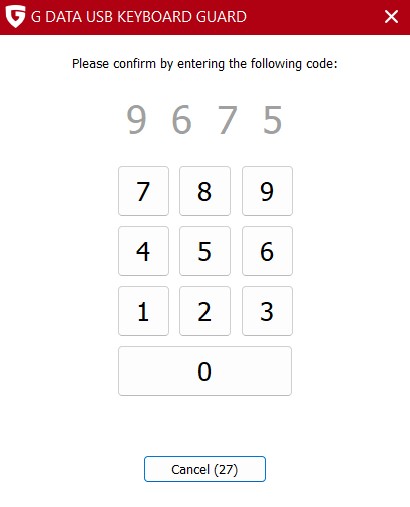
Once you have entered the code, you can use the device as usual. The G DATA USB Keyboard Guard remembers the devices that have been authorized, so you only need to go through the authorization process once.
| If you accidentally blocked a device, simply reconnect it. It will be recognized again, and you can authorize it. When needed, restart your computer if the device is not recognized immediately. |
Block devices that were previously allowed
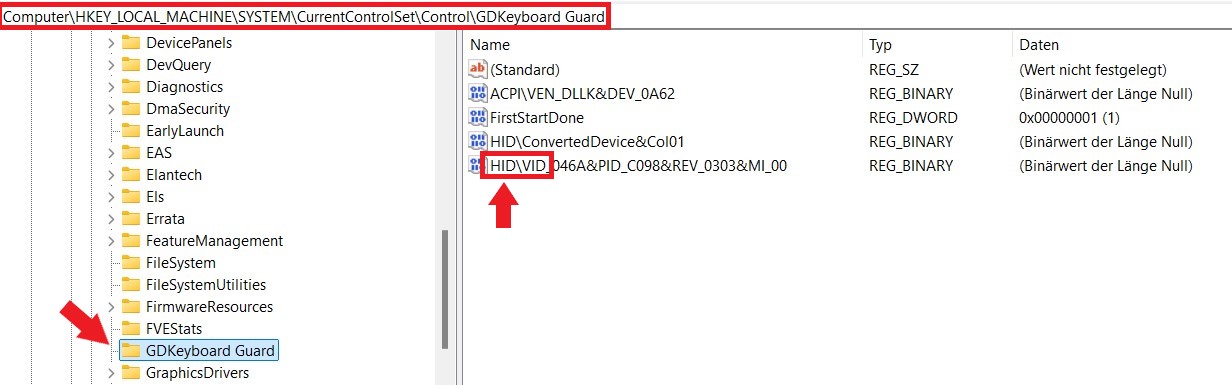
If you have enabled a keyboard but later decide you would rather disable it, you will need to make changes to the Windows Registry. Please only edit the Windows Registry if you are familiar with it! Incorrect changes to the Registry can cause Windows to become unstable.
| Alternatively, you can uninstall the G DATA USB Keyboard Guard and then reinstall it. This is more time-consuming, but you do not need to be familiar with the Windows Registry. |
1 |
Open the Windows Registry using the Registry Editor. |
|
2 |
Navigate to HKEY_LOCAL_MACHINE\SYSTEM\CurrentControlSet\Control\GDKeyboard Guard in the Registry. |
|
3 |
Delete all entries that begin with “HID\VID,” as shown in the screenshot above. |
|
4 |
Restart the computer. After restarting, the device will be detected again and will be blocked by default. |
|
Installation and Configuration for System Administrators
The G DATA USB Keyboard Guard can be installed silently via a script, and the text used in the program can be customized.
Installation via script
Show
When calling the installation file, use the following parameters:
/_QuietInstallation="true" /@SelectedLanguage="en" /_InstallAllRessources="true”The installation path is C:\Programme (x86)\G DATA\USB KEYBOARD GUARD.
| A quiet installation also requires a reboot of the affected system. |
Customizing the displayed text
Show
You can customize specific sections of text in the program by inserting RTF files to individual text sections. To do this, create a file named config.ini. By default, G DATA USB Keyboard Guard looks for such a file in C:\Program Files (x86)\G DATA\USB KEYBOARD GUARD\config. Alternatively, you can specify any other folder by entering the full path as a string in config_dir in the registry key "HKEY_LOCAL_MACHINE\SOFTWARE\WOW6432Node\G DATA\GD2NDKBB".
Create a configuration file with the following content and customize the file.
| If you do not specify an absolute or relative path in the config.ini, the USB Keyboard Guard will load the RTF files from the config subfolder of the installation directory. |
| The paths and files in the configuration file shown are examples and must be adapted to suit your specific scenario. |
[text]
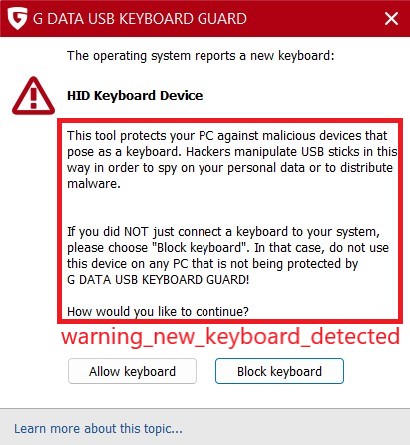
warning_new_keyboard_detected = warning.rtf
hint_enter_code_top = top.rtf
hint_enter_code_bottom = bottom.rtf
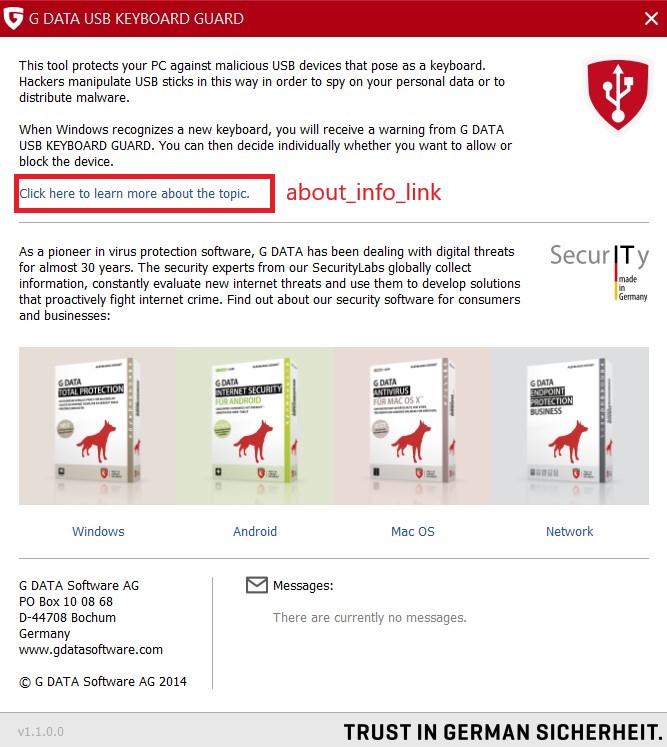
[about_info_link]
destination = file://./index.htm
[link1]
text = Example text one
destination = http://sharepoint/info1.htm
[link2]
text = Example text two
destination = http://sharepoint/info2.htm| Variable | Text area |
|---|---|
warning_new_keyboard_detected |
|
hint_enter_code_top |
|
[about_info_link] |
|
[link1(-X)] |
This section of the config.ini file contains settings for links, if any are included in the RTF files linked in the [text] section. When editing an RTF file, you can enter links in the format <LINK>link1</LINK>. The USB Keyboard Guard then uses the link settings defined in the section of the same name in the config.ini file. You can choose any name you like, as long as the value in the RTF file matches the value in the config.ini file. |